謎めいたインテント
前回の画面遷移のところで出てきた、インテントについて調べてみたが、結構奥が深くまだまだ謎の部分が多い。
とりあえず、わかる範囲でまとめてみる。
画面遷移の復習
まず、画面遷移の復習として、
前回の画面遷移プログラム2と
画面遷移プログラム3
を合体して、遷移先アクティビティと遷移先アクティビティで相互にデータをやりとりするプログラムの例を示します。
ここでは、ただ単に2つのプログラムを合体するだけでは面白くないので、遷移元アクティビティと遷移先アクティビティ
を異なるパッケージに実装する事にします。
画面遷移プログラム4(1)-遷移元アクティビティ(ActivityTarget.java)
01 | package gudon.sample.activityTarget; |
03 | import gudon.sample.other.OtherActivity; |
04 | import android.app.Activity; |
05 | import android.content.Intent; |
06 | import android.os.Bundle; |
07 | import android.view.View; |
08 | import android.widget.Button; |
09 | import android.widget.LinearLayout; |
10 | import android.widget.TextView; |
11 | import android.widget.Toast; |
13 | public class ActivityTarget extends Activity { |
14 | public final static int REQUEST_CODE = 1 ; |
17 | public void onCreate(Bundle savedInstanceState) { |
18 | super .onCreate(savedInstanceState); |
20 | LinearLayout layout = new LinearLayout( this ); |
21 | layout.setOrientation(LinearLayout.VERTICAL); |
22 | setContentView(layout); |
24 | final TextView tv = new TextView( this ); |
27 | Button button = new Button( this ); |
28 | button.setText( "画面遷移" ); |
29 | button.setOnClickListener( new View.OnClickListener() { |
30 | public void onClick(View v) { |
31 | Intent intent = new Intent(ActivityTarget. this , |
33 | intent.putExtra( "int Value" , - 123 ); |
34 | intent.putExtra( "String Value" , "abc" ); |
37 | startActivityForResult(intent, REQUEST_CODE); |
38 | } catch (Exception ex) { |
39 | tv.setText(ex.toString()); |
40 | Toast.makeText(ActivityTarget. this , |
41 | "OtherActivityへの画面遷移に失敗しました。" , Toast.LENGTH_LONG) |
46 | layout.addView(button); |
50 | protected void onActivityResult( int requestCode, int resultCode, Intent data) { |
51 | if (requestCode == REQUEST_CODE) { |
52 | if (resultCode == RESULT_OK) { |
53 | CharSequence strValue = data |
54 | .getCharSequenceExtra( "return String" ); |
58 | String.format( "前画面からの戻り値は「%s」です。" , strValue |
59 | .toString()), Toast.LENGTH_LONG).show(); |
画面遷移プログラム4(2)-遷移先アクティビティ(OtherActivity.java)
01 | package gudon.sample.other; |
03 | import android.app.Activity; |
04 | import android.content.Intent; |
05 | import android.os.Bundle; |
06 | import android.view.View; |
07 | import android.widget.Button; |
08 | import android.widget.EditText; |
09 | import android.widget.LinearLayout; |
10 | import android.widget.TextView; |
12 | public class OtherActivity extends Activity { |
15 | protected void onCreate(Bundle savedInstanceState) { |
16 | super .onCreate(savedInstanceState); |
18 | LinearLayout layout = new LinearLayout( this ); |
19 | layout.setOrientation(LinearLayout.VERTICAL); |
20 | setContentView(layout); |
22 | Intent intent = getIntent(); |
23 | int iValue = intent.getIntExtra( "int Value" , - 1 ); |
24 | CharSequence strValue = intent.getCharSequenceExtra( "String Value" ); |
26 | TextView tv = new TextView( this ); |
27 | tv.setText(String.format( "iValue=%d\nstrValue=%s" , iValue, strValue)); |
30 | final EditText editText = new EditText( this ); |
31 | layout.addView(editText); |
33 | Button button = new Button( this ); |
35 | button.setOnClickListener( new View.OnClickListener() { |
36 | public void onClick(View v) { |
37 | Intent intent = new Intent(); |
38 | intent.putExtra( "return String" , editText.getText()); |
39 | setResult(RESULT_OK, intent); |
43 | layout.addView(button); |
45 | button = new Button( this ); |
46 | button.setText( "キャンセル" ); |
47 | button.setOnClickListener( new View.OnClickListener() { |
48 | public void onClick(View v) { |
49 | setResult(RESULT_CANCELED); |
53 | layout.addView(button); |
前回同様、マニフェストファイル(AndroidManifest.xml)には、遷移先のアクティビティの登録が必要です。
画面遷移プログラム2と画面遷移プログラム3を合体しただけなので、
特にプログラムの説明は必要無いと思います。
コンポーネント
本題のインテントに入る前に、もうちょっと寄り道してアンドロイドのコンポーネントについて簡単にまとめてみます。
コンポーネントという言葉は、アクティビティのウィジェットを指す時にも使われますが、
ここでいうコンポーネントとは、それとは別のアプリケーションの構成要素としてのコンポーネントです。
アプリケーションのコンポーネントとは、システムの要求に応じて呼び出す事ができるアプリケーションの構成要素です。
そのアプリケーションが許可していれば、インテントを利用してアプリケーションより、他のアプリケーションを呼び出す事ができます。
アプリケーションは、コンポーネント単位で呼び出す事ができます。
今まで、アンドロイドのアプリケーションのコンポーネントとして、アクティビティクラスを作成してきました。
コンポーネントにはアクティビティの他にも、サービス, ブロードキャストレシーバ,コンテンツ プロバイダと呼ばれるコンポーネントが存在していて、
必要に応じて呼び出す事ができます。
- アクティビティ
コンポーネントでは唯一GUIを持ち、フォアグランドでユーザと対話する事ができるコンポーネントです。
Activityクラスを継承したクラスとして実装されます。
画面遷移の例でみてきたように、startActivityメソッドやstartActivityForResultメソッドを使って起動されます。
画面遷移の例では自アプリケーション内のアクティビティを呼び出していましたが、これらのメソッドを使って他のアプリケーションのアクティビティを呼び出す事もできます。
- サービス
バックグラウンドで動作し、アプリケーションの要求に応じて、いろいろなサービスを提供するコンポーネントです。
よくとりあげられるmp3などの音楽ファイルの演奏の例をあげると、アクティビティを起動して、GUIにより音楽ファイルを選択してサービスに渡すと、
音楽ファイルの演奏にもうGUIは必要無いので、別のアプリケーションを使うためアクティビティを終了させる事があります。
アクティビティが終了しても、音楽ファイルの演奏をし続けます。
これは、起動したアクティビティが終了しても、サービスはまだ生き続ける事ができるためです。
サービスはServiceクラスを継承したクラスとして実装されます。
startServiceメソッドでサービスを起動して、 stopServiceメソッドを使って停止する事ができます。
また、bindServiceメソッドで接続を確立して、unbindServiceメソッドで接続を解除する事もできます。
サービスのプログラムの例については「サービスとNotification」を参照して下さい。
- ブロードキャストレシーバ
ブロードキャスト レシーバは、ブロードキャストの連絡を受信して、それに対処する処理を受け持つコンポーネントです。
たとえばタイム ゾーンが変更されり、電池の残量が少なくなった事を検知するなど、何らかの状態が変化した時に、
これをアプリケーションに知らせるためにブロードキャストが送信されます。
アプリケーションでは、これをブロードキャストレシーバで受診して、何らかの処理をおこなう事になります。
ブロードキャストレシーバはBroadcastReceiverクラスを継承したクラスとして実装します。
ブロードキャストによる配信が必要なった場合は、sendBroadcast等のメソッドを使って配信をおこないます。
ブロードキャストレシーバのプログラムの例については「ブロードキャストレシーバ」を参照して下さい。
- コンテンツ プロバイダ
コンテンツ プロバイダは、データを管理していて、
アプリケーションからデータに対する要求があった場合に、データの処理をおこないます。
ContentProviderクラスを継承したクラスとして実装されます。
コンテンツ プロバイダのプログラムの例については「コンテンツ プロバイダ」を参照して下さい。
アプリケーションがコンポーネントを認識するためには、
マニフェストファイル(AndroidManifest.xml )へのコンポーネントの登録が必要です。
インテントの要素とインテントフィルタ
アプリケーションから、コンテンツ プロバイダ以外のコンポーネントを呼び出す場合には、
インテントにコンポーネントの呼び出し情報をセットして渡してやる必要があります。
コンテンツ プロバイダでは、ContentResolverを使ってデータのやりとりをおこないます。
インテントとは意図とか目的という意味ですが、
この場合の意図とは、アプリケーションをどのように呼び出すかという呼び出し側の意図を、意味しているものと思われます。
インテントの要素
インテントを使ってコンポーネントを呼び出す場合には、以下のようなインテントオブジェクトの要素に呼び出し情報を指定します。
- コンポーネント名
インテントにコンポーネント名を指定して、コンポーネントを呼び出す事ができます。
これを、「明示的」なコンポーネントの呼び出しといいます。
コンポーネント名の指定は、Classオブジェクトを引数に指定してsetClassメソッドを使って指定する事ができます。
また、コンポーネント名をsetComponentメソッド,setClassNameメソッド を使って、
パッケージ名とコンポーネントのクラス名で指定する事もできます。
パッケージ名は、アンドロイドプロジェクトを作成する時に指定したパッケージ名
(すなわちマニュフェストファイルのmanifestタグのpackage属性の値)を指定します。
クラス名はコンポーネントのクラス名を、クラスの完全修飾名で指定します。
- アクション
アクション名を使って、コンポーネントを「暗黙的」に呼び出す事もできます。
- データ
データにはURIとデータタイプを指定します。
URIはscheme,host,port,pathで構成されていて、「scheme://host:port/path」の形式で指定します。
データタイプはデータの MIMEタイプを、例えばjpeg画像をやりとりする場合には「image/jpeg」を指定します。
- カテゴリ
カテゴリは定義済みの値で、コンポーネントの付加的な情報を指定します。
例えば、アプリケーション ランチャにコンポーネントを表示する場合は、「android.intent.category.LAUNCHER」を指定します、
- エクストラ
エクストラは画面遷移プログラム4の例のように、putExtraメソッド等を使ってハッシュマップのようにキーと値を指定して、呼び出し先に呼び出し元のパラメータを渡す事ができます。
- フラグ
定義済みのフラグを指定して呼び出されるコンポネントの起動方法を指定できるようです。
それぞれの要素に、どうのような値を指定するかについては、参考URLの項を参照して下さい。
インテントフィルタ
コンポーネントが認識されるようにするには、マニュフェストファイルにコンポーネントに関する情報を記述する必要があります。
そして、そのコンポーネントのタグにネストして、インテントフィルタにコンポーネントを特定するインテントの要素を指定します。
言葉だけではなかなか説明しずらいので、具体なプログラムの例をみていきます。
アクションを使って他のアプリケーションのコンポーネントを呼び出す。
インテントにアクションを指定して、他のアプリケーションのコンポーネントを呼び出してみます。
Webブラウザや地図表示等のあらかじめアンドロイドに用意されているアプリケーションを呼び出す
次のプログラムでは、Webブラウザや地図表示等の、あらかじめアンドロイドに用意されているアプリケーションを呼び出します。
地図を表示するには、エミュレータのターゲットとして「Google APIs」を選択する必要があるようです。
インテントプログラム1(IntentSample1.java)
01 | package gudon.sample.intent1; |
03 | import android.app.Activity; |
04 | import android.content.Intent; |
05 | import android.net.Uri; |
06 | import android.os.Bundle; |
07 | import android.view.View; |
08 | import android.widget.Button; |
09 | import android.widget.LinearLayout; |
10 | import android.widget.Toast; |
12 | public class IntentSample1 extends Activity { |
15 | public void onCreate(Bundle savedInstanceState) { |
16 | super .onCreate(savedInstanceState); |
18 | LinearLayout layout = new LinearLayout( this ); |
19 | layout.setOrientation(LinearLayout.VERTICAL); |
20 | setContentView(layout); |
22 | Button button1 = new Button( this ); |
23 | button1.setText( "愚鈍人サイトを表示" ); |
24 | button1.setOnClickListener( new View.OnClickListener() { |
25 | public void onClick(View v) { |
26 | doIntent(Intent.ACTION_VIEW, |
30 | layout.addView(button1); |
32 | Button button2 = new Button( this ); |
33 | button2.setText( "地図を表示" ); |
34 | button2.setOnClickListener( new View.OnClickListener() { |
35 | public void onClick(View v) { |
36 | doIntent(Intent.ACTION_VIEW, "geo:36.2,139.5" ); |
39 | layout.addView(button2); |
41 | Button button3 = new Button( this ); |
42 | button3.setText( "DIAL" ); |
43 | button3.setOnClickListener( new View.OnClickListener() { |
44 | public void onClick(View v) { |
45 | doIntent(Intent.ACTION_DIAL, "tel:12345678" ); |
48 | layout.addView(button3); |
50 | Button button4 = new Button( this ); |
51 | button4.setText( "ActivityTarget2" ); |
52 | button4.setOnClickListener( new View.OnClickListener() { |
53 | public void onClick(View v) { |
54 | doIntent(Intent.ACTION_VIEW, |
58 | layout.addView(button4); |
61 | private void doIntent(String action, String uriString) { |
63 | Intent intent = new Intent(action, Uri.parse(uriString)); |
64 | startActivity(intent); |
65 | } catch (Exception e) { |
66 | Toast.makeText( this , "失敗\n" + e.getMessage(), Toast.LENGTH_LONG) |
このプログラムを実行すると、以下の画面が表示されます。

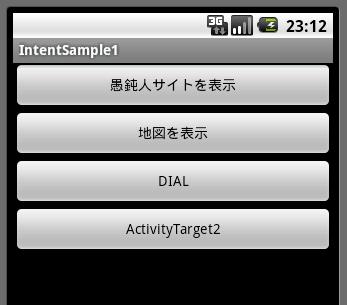
「愚鈍人サイトを表示」ボタンを押すと、Webブラウザが起動して以下のように当サイトのホーム画面が表示されます。

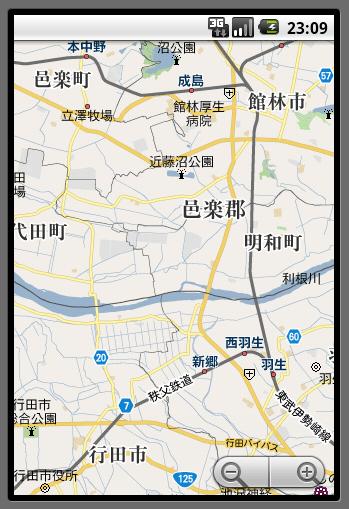
「地図を表示」ボタンを押すと、以下のように、私の住んでいる行田市の地図が表示されます。

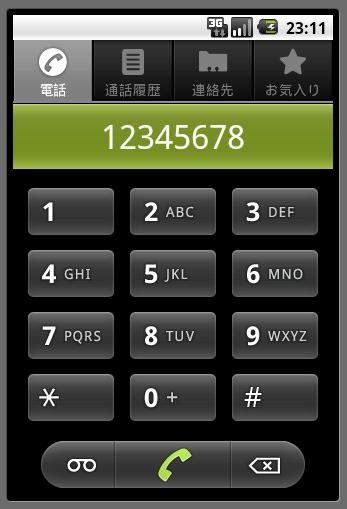
「DIAL」ボタンを押すと、電話のダイヤル画面が表示されます。

「ActivityTarget2」ボタンは、まだ押さないで下さい。
後で紹介するプログラムをインストールすると、自作のActivityTarget2プログラムを呼び出す事ができますが
これについては後述します。
インテントプログラム1のソースを参照して下さい。
各ボタンのイベント処理メソッドは、doIntentメソッドを呼び出しています。
doIntentメソッドでは、action引数とuri引数を指定してIntentオブジェクトを作成して、startActivityメソッドを呼び出しています。
「愚鈍人サイトを表示」ボタンが押された時に渡されるアクション引数には、Intentクラスにあらかじめ定義されているACTION_VIEW定数が指定されています。
Android DevelopersのIntentクラスのリファレンスを参照すると、
ACTION_VIEW
定数には文字列「android.intent.action.VIEW」が定義されていることがわかります。
Intentクラスには、他にもアクションを示す定数が定義されていて、アンドロイドにあらかじめ用意されているアプリケーションを呼び出す事ができます。
例えば、「DIAL」ボタンの処理のようにIntent.ACTION_DIAL定数を指定すると、電話のダイヤル画面を呼び出す事ができます。
Intentオブジェクトに、アクションだけでなく前項のインテントの要素をいろいろと組み合わせて指定すると、さまざまなアプリケーションを呼び出す事ができます。
例えば、同じアクションIntent.ACTION_VIEWに対しても、
uri引数に「http」を指定するとWebブラウザが、「geo」と地図座標を指定すると地図が表示されます。
プログラムの36行目の「geo」の後の数値36.2と139.5は地図の緯度と経度を指しています。
アクションを使って自作のアンドロイドアプリケーションを呼び出す。
アクションを使って、自作のアンドロイドアプリケーションを呼び出す事もできます。
Intent.ACTION_VIEW定数を使って呼び出す事ができる、自作のアプリケーションを作成してみます。
インテントプログラム1の「ActivityTarget2」ボタンを押す事で、このアプリケーションを呼び出す事ができます。
(このプログラムは単独でも実行できますが。)
eclipseに新しいアンドロイドプロジェクトを作成して、以下のようなアクティビティクラスを作成します。
インテントプログラム2(ActivityTarget2.java)
01 | package gudon.sample.activityTarget2; |
03 | import android.app.Activity; |
04 | import android.content.Intent; |
05 | import android.net.Uri; |
06 | import android.os.Bundle; |
07 | import android.view.View; |
08 | import android.widget.Button; |
09 | import android.widget.LinearLayout; |
10 | import android.widget.TextView; |
12 | public class ActivityTarget2 extends Activity { |
15 | public void onCreate(Bundle savedInstanceState) { |
16 | super .onCreate(savedInstanceState); |
18 | LinearLayout layout = new LinearLayout( this ); |
19 | layout.setOrientation(LinearLayout.VERTICAL); |
20 | setContentView(layout); |
22 | Intent intent = getIntent(); |
24 | String action = intent.getAction(); |
25 | Uri uri = intent.getData(); |
26 | String scheme = intent.getScheme(); |
36 | String mimeType = intent.getType(); |
38 | TextView tv = new TextView( this ); |
39 | tv.setText( new StringBuffer( "action=" ).append(action).append( "\nuri=" ) |
40 | .append(uri).append( "\nscheme=" ).append(scheme) |
41 | .append( "\nhost" ).append(host).append( "\nport=" ).append(port) |
42 | .append( "\npath" ).append(path).append( "\nmimeType=" ).append( |
46 | Button button = new Button( this ); |
48 | button.setOnClickListener( new View.OnClickListener() { |
49 | public void onClick(View v) { |
53 | layout.addView(button); |
22行目で、このアプリケーションの呼び出しに使われたインテントオブジェクトを取得して、24~44行目でこのインテントオブジェクトの要素を取り出して、TextViewに表示しています。
アプリケーションから、ActivityTarget2アクティビティを呼び出す事ができるようにするためには、マニュフェストファイルにインテントフィルタの設定が必要です。
インテントプログラム2(AndroidManifest.xml)
01 | <?xml version= "1.0" encoding= "utf-8" ?> |
03 | package = "gudon.sample.activityTarget2" |
04 | android:versionCode= "1" |
05 | android:versionName= "1.0" > |
06 | <application android:icon= "@drawable/icon" android:label= "@string/app_name" > |
07 | <activity android:name= ".ActivityTarget2" |
08 | android:label= "@string/app_name" > |
10 | <action android:name= "android.intent.action.MAIN" /> |
11 | <category android:name= "android.intent.category.LAUNCHER" /> |
14 | <action android:name= "android.intent.action.VIEW" /> |
15 | <category android:name= "android.intent.category.DEFAULT" /> |
16 | <data android:scheme= "http" android:host= "localhost" /> |
20 | <uses-sdk android:minSdkVersion= "7" /> |
上記のマニュフェストファイルには、インテントフィルターが2つ存在しています。
はじめの9~12行目のインテントフィルターは、アンドロイドプロジェクトが作成された時に自動的に付加されるインテントフィルターで、
アプリケーション ランチャに、このアクティビティを表示するための設定です。
このインテントフィルターのおかげで、アンドロイドのアプリケーション ランチャに、このアプリケーションのアイコンが表示される仕組みになっています。
2番目の13~17行目のインテントフィルターが、「Intent.ACTION_VIEW」アクションで呼び出されるようにするため、新たに追加した設定です。
アプリケーションを呼び出す事ができるようにするには、categoryタグに「android.intent.category.DEFAULT」を指定する必要があるようです。
dataタグのandroid:scheme属性やandroid:host属性は、URIとして何が指定された時に呼び出されるかの条件を、指定するものです。
例えば、プログラム1の「地図を表示」ボタンでは、uriにschemeとして「geo」が指定されているので、このActivityTarget2アクティビティを呼び出す事はできません。
schemeがhttpでホスト名がlocalhostであるuriが指定された時に、このプログラムが呼び出される事になります。
dataタグにはschemeやhostの他に port, path,mimeTypeを指定する事ができます。
このプログラムを一度エミュレータで実行して、「ActivityTarget2」アプリケーションをエミュレータにインストールした後で、
さきのインテントプログラム1を実行して「ActivityTarget2」ボタンを押すと、
このアクションとURIに該当するアプリケーションが他にも(Webブラウザアプリケーションが)あるため、
以下のように該当するアプリケーションのリスト画面が表示されます。

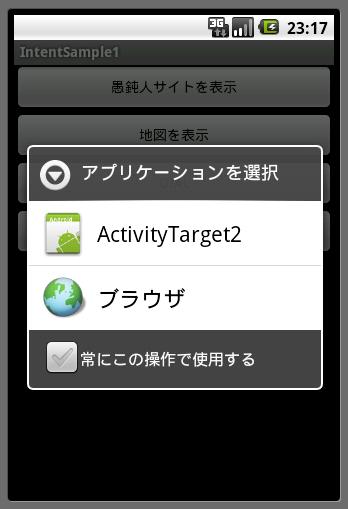
ここで、「ActivityTarget2」を選択すると、以下の画面が表示されます。

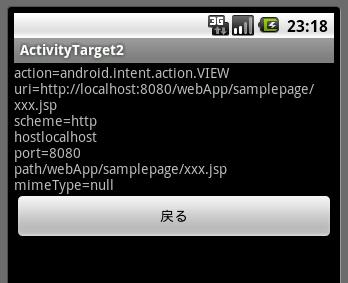
インテントプログラム1の55行目でdoIntentメソッドの引数として指定したURIの値が、TextViewに表示されているのが確認できます。
コンポーネント名を使って他のアプリケーションを呼び出す。
コンポーネント名を指定して、アプリケーションを呼び出す事もできます。
最初の「画面遷移の復習」の「画面遷移プログラム4」を自アプリケーション内からでは無く、
他のアプリケーションからコンポーネント名を指定して呼び出してみます。
他のアプリケーションからOtherActivityを呼び出す事ができるように、マニュフェストファイルを以下のように修正します。
画面遷移プログラム4(3)-呼び出される側(ActivityTarget)のマニュフェストファイル(AndroidManifest.xml)
01 | <?xml version= "1.0" encoding= "utf-8" ?> |
03 | package = "gudon.sample.activityTarget" |
04 | android:versionCode= "1" |
05 | android:versionName= "1.0" > |
06 | <application android:icon= "@drawable/icon" android:label= "@string/app_name" > |
07 | <activity android:name= ".ActivityTarget" |
08 | android:label= "@string/app_name" > |
10 | <action android:name= "android.intent.action.MAIN" /> |
11 | <category android:name= "android.intent.category.LAUNCHER" /> |
14 | <activity android:name= "gudon.sample.other.OtherActivity" |
15 | android:label= "OtherActivity" > |
17 | <action android:name= "gudon.sample.activityTarget.XXX" /> |
18 | <category android:name= "android.intent.category.DEFAULT" /> |
22 | <uses-sdk android:minSdkVersion= "7" /> |
17行目で、独自のアクションとして「gudon.sample.activityTarget.XXX」を定義しています。
このように、独自のアクションを定義する場合には、プロジェクトのパッケージ名を使って、
他のアクションと名前が重ならないようにした方が良いようです。
「画面遷移プログラム4」のOtherActivityを呼び出すアプリケーションのコードは、以下のようになります。
インテントプログラム3-呼び出し側アクティビティ(ActivityUser.java)
001 | package gudon.sample.activityUser; |
003 | import android.app.Activity; |
004 | import android.content.ComponentName; |
005 | import android.content.Intent; |
006 | import android.os.Bundle; |
007 | import android.view.View; |
008 | import android.widget.Button; |
009 | import android.widget.LinearLayout; |
010 | import android.widget.TextView; |
011 | import android.widget.Toast; |
013 | public class ActivityUser extends Activity { |
014 | public final static int REQUEST_CODE = 1 ; |
017 | public void onCreate(Bundle savedInstanceState) { |
018 | super .onCreate(savedInstanceState); |
020 | LinearLayout layout = new LinearLayout( this ); |
021 | layout.setOrientation(LinearLayout.VERTICAL); |
022 | setContentView(layout); |
024 | final TextView tv = new TextView( this ); |
028 | button = new Button( this ); |
029 | button.setText( "画面遷移1-setActionの例" ); |
030 | button.setOnClickListener( new View.OnClickListener() { |
031 | public void onClick(View v) { |
032 | Intent intent = new Intent(); |
034 | intent.setAction( "gudon.sample.activityTarget.XXX" ); |
036 | intent.putExtra( "int Value" , - 123 ); |
037 | intent.putExtra( "String Value" , "画面遷移1-setActionの例" ); |
040 | startActivityForResult(intent, REQUEST_CODE); |
041 | } catch (Exception ex) { |
042 | tv.setText(ex.toString()); |
043 | Toast.makeText(ActivityUser. this , |
044 | "OtherActivityへの画面遷移に失敗しました。" , Toast.LENGTH_LONG) |
049 | layout.addView(button); |
051 | button = new Button( this ); |
052 | button.setText( "画面遷移2-setClassNameの例" ); |
053 | button.setOnClickListener( new View.OnClickListener() { |
054 | public void onClick(View v) { |
055 | Intent intent = new Intent(); |
057 | intent.setClassName( "gudon.sample.activityTarget" , |
058 | "gudon.sample.other.OtherActivity" ); |
060 | intent.putExtra( "int Value" , - 123 ); |
061 | intent.putExtra( "String Value" , "画面遷移2-setClassNameの例" ); |
064 | startActivityForResult(intent, REQUEST_CODE); |
065 | } catch (Exception ex) { |
066 | tv.setText(ex.toString()); |
067 | Toast.makeText(ActivityUser. this , |
068 | "OtherActivityへの画面遷移に失敗しました。" , Toast.LENGTH_LONG) |
073 | layout.addView(button); |
075 | button = new Button( this ); |
076 | button.setText( "画面遷移3-setComponentの例" ); |
077 | button.setOnClickListener( new View.OnClickListener() { |
078 | public void onClick(View v) { |
079 | Intent intent = new Intent(); |
081 | intent.setComponent( new ComponentName( |
082 | "gudon.sample.activityTarget" , |
083 | "gudon.sample.other.OtherActivity" )); |
085 | intent.putExtra( "int Value" , - 123 ); |
086 | intent.putExtra( "String Value" , "画面遷移3-setComponentの例" ); |
089 | startActivityForResult(intent, REQUEST_CODE); |
090 | } catch (Exception ex) { |
091 | tv.setText(ex.toString()); |
092 | Toast.makeText(ActivityUser. this , |
093 | "OtherActivityへの画面遷移に失敗しました。" , Toast.LENGTH_LONG) |
098 | layout.addView(button); |
102 | protected void onActivityResult( int requestCode, int resultCode, Intent data) { |
103 | if (requestCode == REQUEST_CODE) { |
104 | if (resultCode == RESULT_OK) { |
105 | CharSequence strValue = data |
106 | .getCharSequenceExtra( "return String" ); |
110 | String.format( "前画面からの戻り値は「%s」です。" , strValue |
111 | .toString()), Toast.LENGTH_LONG).show(); |
「画面遷移1-setActionの例」ボタンのonClickメソッドは、アクションを指定してOtherActivityを呼び出すコードの例です。
「画面遷移2-setClassNameの例」ボタンのonClickメソッドは、setClassNameメソッドを使ってコンポーネント名を指定して、OtherActivityを呼び出すコードの例です。
setClassNameメソッドの代わりに、setComponentメソッドでもコンポーネント名を指定してコンポーネントを呼び出す事ができます。
「画面遷移3-setComponentの例」ボタンの、onClickメソッドはこの例です。
「画面遷移2-setClassNameの例」や「画面遷移3-setComponentの例」のように、
コンポーネント名を指定してコンポーネントを呼び出す方法は、明示的な呼び出しとなります。
それに対して、「画面遷移1-setActionの例」のようにアクションを指定してコンポーネントを呼び出す方法は、
特定のコンポーネントを名指しで指定するのではなく、アクションにより間接的に指定しているので暗黙的な呼び出しとなります。
参考URL
- Android Developers
- インテンスの要素となるアクション,カテゴリ,エクストラ,フラグにはどのようなものがあるかについては、以下のURLが参考になりそう。